This blog is all about how to create make up looks and new ideas and also product reviews!

Tuesday, November 25, 2014

Best Quality High End Highlighters-Illuminaters

Hey everyone, thank you for reading!

I was at Sephora and I was experimenting with makeup (obviously) which I love to do!

I am looking to purchase a high end illuminater/highlighter so I was deciding on buying what I have on here. I first take some samples from Sephora before purchasing because I want to try it out.
You cannot take a sample of powders, so obviously I didn't do that.

I heard a lot about the Josie Maran Argan Illuminizer, which some Youtubers were raving about (my favorite beauty guru on Youtube is Farak Dhukai) She mentioned it.

I was thinking, well, lets go check it out!


So I tried it out in Sephora and then my husband took this picture of me. I saw the picture, and you can see that glow, right? Its so beautiful! I fell in love with the Josie Maran Argan Illuminizer. I think the consistency and the texture of the liquid is also very blendable and it has gold shimmers in it so it will make your cheekbones glow.

On top of the Josie Maran Argan Illuminizer, I added ...Urban Decay's Naked Illuminater. in Luminous. It has champagne shimmer, with iridescent shimmer. It was very pigmented, and after trying out all the other brands (Laura Mercier, M.A.C sof and gentle, and Bobbi Brown) I came to the conclusion that I love the Urban Decay's highlight powder. "Dust on Urban Decay’s Naked Illuminated Shimmering Powder for Face and Body to give you a sexy, just-finished flush. Naked Illuminated powder is first baked on a terra cotta disc for 24 hours, and then it is finished by hand. Baking the powder gives it a high level of just-perfect shimmer, without the metallic look of cheaper formulas." (sephora) 

If you want that extreme glow like the picture above, then do what I did. If you want a light natural glow just add the Josie Maran Argan Ilumizaor itself. Adding the Urban Decay Naked Illuminater will give you a bright extreme glow.

So my top two favorite highlighter in liquid and baked powder is


  1. Josie Maran Argan Illunizer
  2. Urban Decay Naked Illumator - in Luminous 
You can purchase them at Sephora, Ulta or the brand websites.

I hope this helped you in choosing a highlighter! 

Now I cant wait to pick these products up soon! 

xoxo
Naz


Tuesday, November 18, 2014

How to make your LASHES longer!

Ever thought about taking care of your eyelashes? 

Eyelashes block the dust from entering your eyes, they block bacteria and dirty particles from entering your eyes. 
To take care of them you will need to use natural remedies, not chemical remedies.

1. Olive oil- apply little bit of extra virgin olive oil on top of your eye lids, olive oil has vitamins that will nourish your lashes and thicken them naturally. It protects your hairs from being weak and strengthens them.
2. Coconut oil to remove eye makeup- start using coconut oil to remove your eye makeup, Coconut oil is very light and soft on the skin. It always smells so nice too, plus its beneficial for your lashes because it will help them grow long! 
3. Castor oil- This oil is very sticky and its thick, so apply very little on your lash tips. Using clean fingers to massage on top of your eye lids, do not apply too much since its too thick. Just massage your lids and top lash line with it, and you will see results in couple weeks. (best results to do before going to bed) 
4. White petroleum jelly- It has vitamin E and vitamin E is great for your lashes, it will nourish them. Make sure not to apply too much, take very little but and melt it on your finger tips, then very gently apply on lashes, dont pull your lashes. (best results to do before going to bed) 
5. Wash your face- make sure after a long day you wash your face with your face wash, and clean your eyes with cold water, dont scrub your eyes so hard that will make your lashes fall.

I hope this helped 
For best results use Extra Virgin Oils and Organic oils
Do before going to bed
Do not apply too much 
Do not apply in the eyes
BE careful

Thank you for reading
xoxo
Naz 

Thursday, November 13, 2014

Late October-November Beauty Haul 2014


Hello lovelies, it was my birthday on October 19th, so I decided to get some new makeup! Such a great excuse right? I purchased this stuff during October ending until beginning of November, and I am so happy that I did! Because I love all of this stuff! (Some things are also gifts!)

1. Ecotools fan brush: I needed a highlight brush so I went to Ulta and purchased the brush. But I don't use it for highlighting my face. I actually use it to contour, it gives a nice finish and isn't harsh so it blends the color very well. (I received a gift from Sephora which was by Makeup Forever- it has a tavel size mascara and beautiful lipstick in it.)
2. Too Faced Chocolate Soliel Bronzer as a gift for my birthday- Which I love! So I use the fan brush to contour my face! Now every time I wear the bronzer people ask me what it is! So go grab it if you didn't! Its a beautiful shade and gives you a perfect sculpted look if you add more or if you add less it will still give you a light sculpted contour! 

3. The Vice 3 pallete has been on my mind since U.D released it. It was also a gift for my birthday which I love! The colors are so pigmented, and I love all the colors, they are all so perfect for all occasions! Weddings, small parties, the lighter shades are great for work or school. I really love the pigmentation and I really love all Urban Decay's eye shadows since I don't really get an allergic reaction plus the color pigmentation just makes me a loyal customer. My eyes turn red 
 and itch easily, so when I use these shadows nothing happens. That's why I love them. 
4. NYX Glitter Liner: I used to own the Sephora glitter liner in gold but it was finished so it was time to buy a new one. The Sephora glitter liners dry very fast. I used it maybe only 8-10 times and that's it, its dried out. So I did not repurchase that one. I bought the NYX gold glitter liner this time. I tried it out and I like the way it looks. It looks very pretty when you use golden eye shadows and then line your upper lash line with it. (I love gold I am obsessed with golden eye makeup!)
5. M.A.C Gold pigment: I like all of M.A.C's products, I always buy my powders and foundations from there. I initially was going to purchase their highlighter in Soft and Gentle- until I noticed their golden pigment- I purchased it and its now my all time favorite pigment, its so gorgeous! The makeup artist said that I can also apply in on my cheeks as a highlighter- so I said "wow!" (I know that already! LOL) Its a very antiqued gold with a yellow metallic finish. If you are in need of a pigment for wedding makeup and party makeup that will pop and bring out your eye makeup ALSO use it as a highlight on your cheeks-- buy the gold pigment from MAC. 
6. NYX lip cream & M.A.C lipstick: Last but not least I purchased two lip products because I needed a pink-nude shade lip cream and a lipstick that looked really pretty on me. I purchased the NYX lip cream in Stockholm it is matte and has a pink nude tone and it looks very pretty on everyone! I also purchased a lipstick from M.A.C that is called Taupe it is a matte lipstick. It is a light coffee nude. These two are my everyday lip colors! **Other nude shades that will look pretty on everyone : Myth (original nude), Freckletone (orange/medium nude) Peachstock (peach nude) Modesty (pink nude) and also Honey love (honey nude)... (You can mix the nude colors in with any other lip shade as well and create a color that you desire.)

Thank you so much for reading, if you want to buy any of these products they are available in Ulta stores and M.A.C stores!

xoxo
Naz <3

Tuesday, November 4, 2014

***Smokey Purple Eggplant Eye Makeup***

Hey beauties, my favorite go to fall look is the smokey purple look and I am in love with purple these days. For this look I will be using

  • Using my IT Cosmetics fluffy crease brush, and the Vice 3 brush (came with palette) 
  • NYX base pot
  • Urban Decay Vice 3 shadows
  • NYX Glitter Liner
  • Lancome Nior Eye pencil in Black
  • Makeup Forever Smokey Extravagant Mascara
  • LOreal brown eye shadow 

  1. First I apply the NYX base all over my eye lids
  2. I then took my Vice 3 palette and took the color Vanity and applied that all over my lid only
  3. I took a fluffy brush and created a transition by using the color Downfall
  4. Next I mixed Downfall and Bondage and created a red brown shade for the crease
  5. I applied Bondage on my lid again
  6. Taking Last Sin (my favorite color from the palette) from the palette I applied that to my inner corner and highlighted my brow bone. (this color is seriously the best highlight color I've seen-its so beautiful, pigmented and has gold and pink specs of glitter, its a white pinky golden color, yes I said white pinkey lol) 
  7. Taking my NYX glitter liner, I applied that on my eye lids, so I lined it on top of my lash line
  8. I applied 2 coats of Mascara
  9. I then lined my tightline and waterline with Lancome black eye pencil.
  10. I filled in my brows with my favorite LOreal brown eye shadow, its the best for me, it works really well and give this natural look.
To achieve this look, I worked on it for about 10-15 mins on my eyes only because I wanted it to look flawless with no harsh lines. So you must blend in order to achieve that look. 

***Thank you for reading, I hope you can also re-create this beautiful Smokey Purple Eggplant Eye look because it does look gorgeous on everyone!***
xoxo
Naz


Thursday, October 23, 2014

Home Remedies for Treating Pigmented Lips

Home Remedies FOR Treating Pigmented LIPS: 

  •  Eat plenty of green vegetables: Cucumbers, lettuce, kale. Just make a salad!
  • Drink a lot of water everyday: I drink 7 glasses every day, I mean I at least TRY TO! (lol)
  • Apply honey on your lips and just leave it all night: You can buy honey at any grocery store. Raw honey is highly recommended by Ayurveda doctors & specialists.  
  • Rub Cucumber on your lips: You can also create a cucumber paste at home.
  • Rose water from natural roses creates the pink lips that anyone would love
  • Use beeswax chap sticks: You can find that at Walgreen's or any drug store
  • Dab apple cider vinegar from a cotton ball on your lips: You can order apple cider vinegar on Amazon
  • Apply castor oil before you go to bed: Go to your local Indian or Arabic grocery store and ask if they carry castor oil. check if it is organic, then purchase it.
  • Stop smoking: not good for your teeth, lips and for your whole body! 
  • Stop drinking coffee: coffee stimulates your mind and keeps you awake but it will darken your teeth and turn your lips dark.
  • Drink a lot of milk, its healthy for you!
  • Massage your lips with olive oil: Olive oil is highly praised, it has nourishing vitamins and it moisturizes your lips leaving them soft and clean.
  • For red natural lips apply beet juice on them: yes I said beet juice! not beetle juice! (lol)
  • Lemon juice reduces pigmentation: just make sure you don't have any cuts on your lips or you didn't bite your skin off your lips, because if you did that then it will sting! During the winter, lips become very chapped and dry, so people sometimes bite the skin (flake) off, if you do that and apply lemon juice it will sting a lot. So, make sure your lips are smooth. 

pigmented lips lip pigmentation


Thank you for reading and I hope this helped :) 

xoxo
Naz

Tuesday, October 21, 2014

My Birthday Makeup Look! Inspired by DressYourFace

Hey guys, this will be a look on how I did my makeup on my birthday. I was so excited and I am so happy that all my family and friends  came to celebrate with me. 

 I created a golden smokey eye with glitter. 
Which is my one of my favorite looks! The Glitter look is inspired by Dress Your Face, because she usually uses glitter and her looks are all glam, so I wanted my eyes to be the center of attraction for that glam look :) 

If you are interested in getting my birthday look (in the picture) then keep reading. Thank you!

First you will need
** you will need makeup brushes to create this look

FACE:

  1.  Tarte face primer
  2. . MAC Studio sculpt foundation & MAC loose powder
  3. Milani Concealer 
  4. . Makeup Forever mist&fix spray. brown shade to contour
  5. . highlight shade (I used my Lorac duo)
EYES:


  1. . Glitter glue (you can buy it a sally store)
  2. . Golden Eye glitter (sally store)
  3. . Any bright golden eye shadow (I used my LORAC: limited edition)
  4. . matte brown eye shadow to blend in crease 
  5.  brown eye pencil
  6. . mascara
Brows: Any brow powder that matches your eye brows 

LIPS:
  1. . rose pink lip liner (I have Loreal Paris)
  2.  Light nude pink lipstick (I have M.A.C modesty and mixed it some concealer)
  3. Clear lip gloss (I own Elizabeth Arden lip gloss)

Directions

  • I applied my face primer all over my face. I then took a foundation brush and my Studio Sculpt MAC foundation in NC40 and applied that all over my face and blended again with a damp beauty blender.
  • taking my Lorac golden eye shadow, I took my eye shadow brush and sprayed my MUFE mist&fix spray then dabbed it with the golden eye shadow for extra pigmentation. I applied that all over my lid
  • Using the brown shade from the Lorac (limited edition) smokey palette with my crease brush, I gently blended that color all over my crease.
  • Now comes the fun part: I used sally glitter in golden. I created that by mixing it with the sally glitter glue on my hand. Took my flat small detailed  brush, I applied it slowly on my lids only. not crease.
  • I went again to define the crease with the brown eye shadow, to give the crease an extra pop of color
  •  I applied brown eye-pencil in my waterline and tight-line
  • with my small smudge brush I took some of the brown shadow and blended under my waterline  for more smoked out effect. 
  • I used Milani concealer on my under eyes and blended that with my finger
  • Took my big powder brush and applied MAC loose powder all over my  face and applied extra under my eyes so the concealer will set. 
  • Applied Maybelline Falsies mascara - 3 coats 
  • Used my L'Oreal brown eye shadow to fill in the sparse areas of my brows using a small detailed brush 
Now I am going back to the face- for contour and highlighting

  • I took my Lorac contour and hightlight Duo and used the contour shade to contour my face, I took a fluffy crease brush (clean one) and created a line right under where my cheek bones are.
  • Then I applied the hightlight shade right under my brow bone, cupids bow, bridge of my nose, and above my cheek bones. (applied it with my finger)
  • I took a stippling brush and blended the contour line so the line will not be harsh
  • I also took the stippling brush and contoured sides of my nose- I did not over do my nose but I did blend the color on the sides just because I contoured my face and it will not be complete if I did not do my nose (get what I mean:? lol) 
  • with my powder brush I just blended out my face (same powder brush which I applied loose powder)
For my lips:
I lined my lips with my lip liner by LOreal Paris it is a rose nude color
then I applied my lipstick from M.A.C called Modesty
I took a little bit of concealer and dabbed it right in the middle of my bottom lip and then basically closed my lips together so it can blend by itself. 
I took clear lip gloss by Elizabeth Arden  and applied that on my lips.

The color came out as a muted  nude pink, which I love and believe that color looks good on every girl!!! I love it so much! 


There you have it, the look is done! If you want to apply more glitter you can go ahead, just be careful the specs do not go inside your eye. Do it very slowly. I applied enough for my eye, I did not apply any top eye liner because I wanted the glitter to be the attention. Even though you can, and DressYourFace usually does, I just felt like adding my own twist into the look. 

In the end I sprayed my face with MUFE mist&fix so the makeup will be set all night! 

I hope this look gave  you ideas and next time maybe you can try it too :)

Thank you for reading 

xoxo,
Naz


Tuesday, October 14, 2014

What to use for light natural contour and highlight for your face

Hey dolls, so I know how popular highlight and contouring has got these days! Sometimes I feel like if I didn't highlight&contour my face my make up is not finished. In a way that can be true, but it is not 100 percent true because sometimes people want that natural look, the look where you want to wear makeup but you don't want to look like a creamy birthday cake lol. When you have to go to weddings or if it is a special event, I understand you want to wear a lot of makeup, I love to look cakey at weddings because I want to look like I have makeup on! Thats the whole point! But sometimes, natural makeup is the way to go if you just want to go out or to school, or work. Atleast in my opinion :)
I will be showing you my favorite products both high end and low end for easy natural highlight and contouring :)


  1. When I hightlight I add the concealer under my eyes to cover the dark circles, bridge of my nose very thin line, cupids bow and little bit on my forehead and chin (little dots) 
  2. I then use my beauty blender to blend that out
  3. I cover that with the loose powder by M.A.C with my beauty blender.
  4. I then use the Lorac bronzer inside the duo and use my small shading brush to create a line carving out my natural cheek bones. I blend it all with a powder stippling brush so there are no harsh lines. 
  5. I add cheek highlight by adding the highlight shade inside the Lorac duo with a fan brush. That give me my light natural contour and hightlight.


The second picture is my drugstore contour and hightlight products.

  1. I first add Maybelline age rewind in Transparent under my eyes to cover dark circles, bridge of my nose (thin line) top of fore head and some dabs on the chin. I blend it all with the sponge that is on the stick.
  2. I then add the cream concealer by milani, and blend it under the eyes, bridge of my nose and also cupids bow. I blend it all with a beauty blender.
  3. With the milani pressed powder I cover the concealed areas that I covered.
  4. I then carve my natural cheek bones by using revlons photoready concealer stick (2 shades darker than my skin tone )
  5. I blend it all with a small stippling brush for no harsh lines.
  6. Last but not least I use my NYX jumbo pencil in Cottage Cheese/ that color is very pigmented and has a white silver shimmer to it. I add that for cheek highlight. It gives the best highlight glow! 


I will upload pictures of my face soon, one side from high end and one side from low end soon.
I hope you enjoyed reading this and I hoped I gave you some ideas on which products to use for a natural high light and contour look!

xoxo,
Naz

Tuesday, October 7, 2014

Eid al Adha 2014 makeup


Hi guys! I hope your Eid AL'Adha was blessed and I hope you had a wonderful time with your family!
I want to show you how I did my make up on Eid and what products I used to achieve the look.

On the left my picture is up close, and on the right I am posing lol. I purchased my earrings from India when I was there 6 months ago! I am in love with them!!! They remind me of Bollywood fashion so much!

Okay so lets get started!
 On my face the products
 I am using are: 
1. Tarte poreless primer
2. Mac studio fix foundation in nc 35 (my shade) I used the beauty blender by Real Techniques for applying foundation.
3. Milani pressed powder.
4. Lorac highlighter and matte bronzer duo: contour shade on the hollows of my cheeks
5. Lorac duo:  highlight shade on top of the cheek bones
6. Nars blush in orgasm (my favorite blush after the Lorac baked blush)
7. I filled in my brows using Loreal brown eye shadow (its amazing) I personally use powder to fill in brows not pencil, even though I do own a brow pencil, but I have noticed that hairs tend to shed if I keep using the pencil so I just prefer the powder over pencil.
8. I did not use concealer that day (I just spread the foundation all over my face. I did not want to look too caked on Eid)
9. I blended everything so I dont have any harsh lines! I used the stippling brush by Eco Tools.

Eyes: 
1. Added NYX shadow base
2. Makeup Geek shadow in Frappe for transition color in crease
3. MAC Amber lights on lid
4. Blended that well, then added Lucky in my new Vice 3 palette
- Added more shadow to crease (frappe)
5. I used Inglot 77 black gel eyeliner to line my eye lids
6. Urban decay: Black market eye pencil in waterline and tightline
7. I used a smudger brush (elf brush) on bottom lid to smudge the black pencil to create a smokey effect
8. Mascara was falsies by Maybelline  ( put 2 coats on, you can add more coats if you like. I don't use much mascara because allergies)

Lips: 
1. Rimmel lip pencil in nude rose (i forgot the exact name, I think it was nude or nude rose)
2. Sephora red lip stain (I honestly forgot the exact name. but it is a red lip gloss or some type of stain in a tube) **Sephora always sells them! I got mine 2 months ago.
**The Sephora red lip gloss stain is so gorgeous it glides on smooth and does not dry my lips, it also is not very creamy either. Its like a satin matte gloss, if you know what I mean. It doesn't smell and it doesn't make my lips tingle. The red color is a true beautiful bold red, and I love it so much! Its perfect for Eid, and weddings, or if you want to rock it anywhere, go for IT! Red is a gorgeous statement color and expresses love, power and beauty. Its my favorite color!

Hair: I didn't do much with my hair, I just took a shower, and blow dried it. Its naturally straight so I didn't straighten it. I center parted it and bobby pinned the sides. Clipped half hair back and left the rest down.


My outfit was sent from India. I am in love with the colors!

Thanks for reading, and I hoped my makeup gave you some ideas for next time :)

xoxo Naz


Wednesday, October 1, 2014

Makeup Geek eye shadows and pigment review + Drugstore makeup LOOK

Hey dolls, so I ordered some makeup geek shadows online on makeup geek website and I did a swatch of the pigment called Afterglow which is on the right side of the page. It is so pigmented and has a beautiful sheen. It has a light pinky gold color to it  that also looks light yellow too, its very hard to explain but once you see it in person its so pretty. and its gorgeous for a highlight too on top of your cheeks. I am using it for a highlight on the picture, it looks so pretty in person. Sorry I am using a phone camera so you cant really see it in the picture but that's why I have a picture close up on the page so you can actually notice that glow and sheen.

On my eyes I am using make up geek: Frappe and chickadee. Frappe is a light brown color similar to MAC's soft brown. And Chicakadee is a yellow shade. They both have a matte finish to them. I really love the colors on my skin tone but I know they will look gorgeous on any skin tone because they have amazing color payoff and they are noticeable.I also lined by eyes by using Lancome Waterproof black nior eye pencil (i purchased it from Abu Dhabi) I think you can find it at Macys. Lancome has amazing eye liners and eye pencils. Very black. I did not find any eye pencil THAT black!

On my face I used Maybelline Dream Fresh BB Cream in Medium. I put MAC loose powder on top to set it, in a medium shade (I think it was nc35 shade).
I also added a bronzer by Rimmel London (you can get it at Wal-Mart)
I did not contour my face but I did highlight it using the makeup Geek Afterglow pigment.

For lips I used: Stormy Sahara by Maybelline (their nude lips line). It is my favorite nude pink lipstick for this year, I am in love with it! You can get it at Wal-mart, Target or any drug store!
I filled in my brows by using loreal brown eye shadow that I had (i need to buy a new brow powder!) Any you have in mind that wont make the brow hair fall out?

Thanks for Reading, I hope this gave you an idea of a natural makeup look! 
 This is my natural makeup look, basically I do this when out and about. 

xoxo love 
Naz


Tuesday, September 9, 2014

-IN Solidarity- Handmade Ethnic Solidarity Bracelets- PLEASE READ

hey guys, I am starting to create new ethnic bracelets at home. I need your feedback on what you guys like. I am going to create beautiful handmade bracelets with genuine onyx, jade, amethyst, and sterling silver beads.


Every $1.00 on the purchase will go to helpinghand.org to orphans in need as well, so it is like a charity as well as a statement piece! So lets say the bracelet will be $14.00, So you are paying $13, and I will give the $1.00 to charity, and you will be rewarded for that as well!


Please support my idea on spreading awareness about different countries that are oppressed and also standing in solidarity with the people.

Prices will vary. Pretty affordable.

Thank you


Thursday, September 4, 2014

Are your eyes itchy and red? MUST READ!

Hey guys, so I always suffer from eye allergies and it is seriously a pain! My eye allergies are so bad that my eyes become swollen and the red blood vessels turn blood shot. I cannot control it and I cannot feel better at all! I want to wear makeup and stuff but even hypo-allergic eyeliners cause my eye to turn red and itchy.


But now, I has prescribed eye drops and I sometimes use the Visine allergy eye drops that calm my eyes and relieve the pain.

I just want to give some advice to you guys if you are dealing with this eye allergies and how to prevent it or how to notice the symptoms. What you can do to make yourself feel better.


  • First you must understand eye allergies, and how it can happen to you. When you have allergies your body reacts to things that are not harmful such as dust, dander, animal hair, feathers and pollen. When your immune system encounters with these reactants your body releases histamine, and that causes swelling and inflammation.
WHAT ARE YOU ALLERGIC TO?


  1. you can be allergic to dust, pet dander,
  2. pollen and grass
  3. Makeup or perfumes/chemicals
  4. allergy to contact lenses


  • Symptoms to watch for:
  1. Red eyes
  2. Itchiness
  3. swelling
  4. Burning/pain
  5. sensitivity to light
  • Treatment (Antihistamine Pills)
  1. For quick relief buy the counter eye drops that say: Allergy relief. 
  2. OR buy Claritin (loratadine), or Allergra (non drowsy) which contains a ingredient (fexofenadine) that can relieve your eyes from the itchiness and burning sensations. 
  3. If you want a drowsy solution that is available over the counter, there is Benedryl and Zertec (they contain diphenhydramine or cetirizine). 
  • Prescribed Eye Drops:


If your eye allergies do not stop and become worse, then you must consult an optometrist and tell him or her your eye condition. They'll prescribe you antihistamine eye drops. 
IF you just want temporary relief you can get over the counter eye drops such as: Visine allergy relief, Red Eyes. But remember the relief is only temporary, and your eye allergies won't vanish if you just put 2 drops in. So, if you keep using it daily your eyes will be addicted to the sensation and the temporary relief and after a while they will start itching again. So you need to take some type of medication to stop it. 

  • Home Remedy+ extra advice
The best way to stop the itch is put a cold ice cube on your eye lids. 
Wash your eyes, and stop poking and touching your eyes, just leave them alone. 
It will stop the itchiness plus your swelling. Never use any eye make up until the redness and itch is gone. The chemicals in the makeup trigger your eyes and therefore, they will itch again. 

I hope this helped you guys! 
If you are dealing with the pain I hope you feel better! :)

xoxo Naz


Thursday, August 21, 2014

DSLR CAMERA


Hey loves, so I am in the process of buying a new DSLR camera so I can take better quality pictures and record videos or you.

I am very excited to buy it. I am very lucky to have my husband in my life who supports me and will help me record and edit my videos! I am also going to post new and amazing quality pictures for you to see :)

What do you guys think? Do you want to see more of my blog posts and my new videos and if so, WHAT do you want to see more?!

Please let me know!

Love
Naz


Friday, August 15, 2014

Benefits of Castor Oil

What is Castor Oil: 
Castor oil is derived from the seed or bean of the castor plant. It's most commonly used as a laxative, but it has many other reported functions. Castor oil may help eliminate warts, boils, menstrual congestion disorders, ringworm, and fungal and bacterial infections, according to The Analyst website. It may also improve the condition of your hair and aid in hair growth, although little scientific evidence exists to support these claims.

Properties of Castor Oil: 

Castor oil contains vitamin E, minerals, proteins, antibacterial and anti-fungicidal properties. The Castor Oil website attributes its healing benefits to its unusual chemical composition, which consists of a triglyceride of fatty acids with ricinoleic acid of up to 90 percent. In addition to healing benefits, castor oil also contains anti-inflammatory properties, all of which are related to healthy hair growth.
I use castor oil on my eyelashes and eyebrows. It is very beneficial for the lashes and brows because it moisturizes them and stimulates the cells so the hair can grow long and full. You can buy it online at Amazon.com or buy it from a local indian grocery store or arabic grocery store! 
I hope this helped!

Wednesday, August 6, 2014

DEPRESSION AND SADNESS

Hey guys, I just wanted to take some time out and give advice... I know everybody has their own personal problems and their situations are different so I want to give universal advice to you about depression and sadness. 

Rule number one: If you ever feel down, sad or feel like crying because life is being a bi*ch, then you need to look at life in a positive way. Life is short and your situation may be bad or you may feel wrong for the time being, remember your situation is not going to be that way forever. You will be happier sooner or later. 

Rule number two, compare your life to those below you never to those who are higher. Don't look at celebrities and those people who are popular, because if you keep doing that then honestly speaking, you're not going to get anywhere in life! You need to look at those who are suffering, who have less than you, who are tested with more hardships than you. Only then will your heart be more humble and you will appreciate your life. 

Rule number three: The only remedy you have to is do what makes YOU happy. Don't let anybody fool you don't allow others to take over your opinions and voice! You have to be confident in yourself and embrace your beauty. You are never alone, there are others who are in worse situations than you, and don't ever feel like God is punishing you, because He is not. He is testing you, He wants to see how patient you are, and mostly He wants to see if you will go back to Him. Have faith, basically that's what I am saying. Have faith in your spirituality. Have faith in yourself. 


Thank you for reading,
I hope this helped everyone who is dealing with sadness or depression.

God bless you 

Nazia 


Saturday, July 12, 2014

M.A.C: Best Crease Transition Colors!

I am obsessed with two eye shadows by M.A.C that are the perfect transition colors. One is Soft Brown and the other is Texture.

When ever I do my eye makeup I first start applying a transition color to my crease area. I then apply the rest of the shades so no harsh lines can be formed.

Soft brown is such a beautiful color, its so matte and silky. Basically its just like a medium tan color that has no other colors added. Usually brown color have some gold or red added to it, but soft brown is just brown. I really like that color since it suits all skin tones and it is the best transition shade.

Texture is a gold brown shade that is very gorgeous. It has specs of gold. Its basically like gold and brown mixed together and has a velvety finish. Whenever you want to do a gorgeous golden smokey eye, texture should be your transition color. It looks like an orange brown when you see it, but once your wearing it, honestly it is such a beautiful golden brown shade ever!

For now, these are my two favorite shades by M.A.C. My all time favorite shade is amber lights. Amber lights is a golden orange color that is super pigmented and looks so gorgeous on my eyes since they are dark brown. Also amber lights has a beautiful frosty finish that will make your eyes look absolutely stunning!
I will make another post on Amber Lights. I am in the process of getting a new camera and making changes on my blog and I have other ideas planned that will come soon. I hope you will keep up with me :)

thanks for reading loves! :)

Monday, June 2, 2014

BENEFITS OF COCONUT OIL!!! **MUST READ**


I never imagined how much something is a must have in life until I used extra virgin coconut oil! 
Coconut oil is so good for the skin and hair!
These are some KEY POINTS that I will educate you on about how nutritious and essential coconut oil is: 

1. Shield Hair Protein

 Lauric acid is found in coconut oil and has better results than other mineral or sunflower oils when it comes to improving hair health.

2. Seal in Moisture

Moisture is essential for healthy hair so coconut oil protects against environmental impurities and excess heat.

3. Improve Blood Circulation

A coconut oil scalp massage will effectively improve scalp circulation and boost nutrient and oxygen delivery to your hair.

4. Provide Nutrients

Coconut oil is rich in vitamin E, vitamin K and iron and effectively eliminates dandruff while boosting hair growth.

5. Contain Antibacterial and Antifungal Properties

The scalp and hair are high in bacterial content, but coconut oil is an effective remedy to deal with the issue. Coconut oil contains both antifungal and antibacterial properties to protect against dandruff and lice.

I use coconut oil once a week. I massage my scalp and apply it on the ends of my hair so my hair can be healthy and my scalp can be nourished. 
I apply it on my elbows and knees so my skin can be soft. 
I apply it every other day on my eye lids and under eyes (not inside the eyes) and massage my eyes gently for eyelash growth and dimming of my under eye circles.
Coconut oil is such a blessing, seriously if you do not use it, you should go buy some extra virgin coconut oil and use it on your hair and body! 

I hope this information helped you! 
Thanks for reading :) 
XOXO

Smokey Emerald Eyes


What you will need:
Eye shadow primer (all over eyes)
Matte soft brown or soft mocha eye shadow (transition color)
 Matte green eyeshadow (lid color)
Matte brown eyeshadow (crease color)
Green eye pencil (line under eyelid and upper eyelid)
Vanilla eyeshadow (highlight on browbone and inner tear duct)
Mascara
Pencil brush
Crease brush
  1. First you put the primer all over your eye lids (I used Cargo cosmetics primer) 
  2. you then take your crease brush (I used L.A girl crease brush) and apply the matte brown color all over your crease. Blend well.  
  3. What I do now is, I color my eye lid (where I will apply the green shadow) with the green pencil, 
  4. then after I color my eye lid with the green pencil I apply the green eyeshadow. I do that because the green cream from the pencil combined with the shadow will brighten the pigment more. I blend well.
  5. I retouch the crease color and just blend more until I see no harsh lines. 
  6. Once that is finished, I highlight my browbone with vanilla eyeshadow also the inner tear duct 
  7. Then I fill in my eye brows (I use rimmel dark brown brow pencil) 
  8. apply green pencil on your lower eye lid and also smoke it out with the green shadow using a pencil brush ( I used an Avon brush) 
  9. Apply mascara (I use tarte Gifted amazonian clay)
I hope you enjoy this look and if it suits you, then try it out because an emerald eye can never go wrong! Its a beautiful look for spring and summer :) 

xoxo


Sunday, January 19, 2014

HOW TO: 24k Golden Eyes


Hello everybody! I really am loving this gold inspired make up lately, I don't know if it is just me, but I am so into golden eye shadows and gold tinted baked blush. I really think that is suits asian women who have medium skin tones. 
The palette I used to achieve this look was the Urban Decay palette and also some Sally Hansen glitter in gold. 
WHAT YOU NEED:
1. Eye base (all over eye lid)
2. black eye pencil to sketch the cat shape and smoke out bottom lid (I used urban decay)
3. Any dark gold/copper eye shadow (I used half baked and ydk on my lid) 
4. blend the gold eye shadow all over the lid and then add some dark gold eye shadow and blend until you get the color you desire
5. sally girl glitter glue (add some eye glue to your lid)
6. take a flat eye shading brush or your finger and apply gold glitter to the middle of your lid (let it dry)
7.  liquid eye liner for winging your eyes to make cat eye shape
8. Mascara
9. highlight your brow bone with a matte vanilla shade (I used my sally girl palette by femme couture) 
10. fill in your brows 

I hope you liked this look :-)


Friday, January 10, 2014

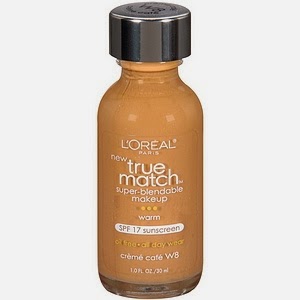
L'Oreal True Match foundation and Voluminous Mascara Review

Hello loves, I amso busy with weddings and family parties in India, and I wanted to do an honest review on some L'Oreal products that I own. I own M.A.C studio finish foundation as well as the L'Oreal true match foundation. Although I am running out of my L'Oreal true match, I am using it all until it is gone. 
The L'Oreal true match foundation is a very soft, velvet liquid that glides on your skin and it is light to medium coverage. The foundation blends very very well into your skin and it does give you a patchy and dry feeling on your skin. It is basically like a naked feeling, but it has a dewy sheen finish to it. It is not extremely dewy like the L'Oreal LUMI foundation. The foundation comes in many shades, and if you test one out then I am sure you will find the right shade. 
To be honest, I chose a dark shade, my skin is not W8 creme cafe, it is actually W6-W7 depending on my tan. I am a sun beige since my skin tone is a light tan. But I picked up the creme cafe color and it is a very beautiful color, so I use  it to add dimension to my cheek bones and I apply a luminizer powder or bronzer on top to get that beautiful tan glow. The foundation does not dry out fast nor does it cause breakouts. I really love it. 
It is the best drug store brand in my opinion because I think it is comparable to the Urban Decay Naked foundation except it has a cheaper price! Amazing right! It will definitely make your skin look fresh and natural in pictures, since you can build up the coverage, you can apply it 2 to 3 times with a beauty blender sponge or a foundation brush to get you that flawless finish. 


I purchased this mascara back in 2009 and since then I kept going back to buy it and I must admit I am a loyal L'Oreal Voluminous customer! I have tried many mascaras and honestly nothing beats this one! It is like a $100 mascara that is sold for $10! (In my opinion atleast!) I mean don't get me wrong I do have the Tarte Amazonian mascara and also some others that I DO use but what I am saying is that THIS ONE in my opinion is better than the ones that I own.
So first of all, this mascara does what it says. It makes your lashes stand out, the product glides on your lashes and boom, your lashes are voluminous. Just one to two strokes and your lashes will look like you have on falsies. But I layer it 3 times to have a very dramatic look since I love that. 
It does not shed, it does not make your lashes clumpy, or sticky. It does not irritate your eyes nor does it smell bad. It comes in waterproof as well, and also different shades. I like blackest black since that is my hair color anyways so I just use that one. I really think that this mascara makes your eyes stand out, and it enhances the look of your entire face. Just a little goes a long way.

I hope my reviews helped you, I will post up pictures as soon as I get back to The States. 
Until then have a wonderful day :-) <3 XOXO